1. beginning

1. beginning

Ayano Kagurazaka Lv3

Ayano why are you starting another new series, Yew!!!
Because I want to~ Also you are right the series is called Yew.

Assuming the environment is set up based on the previous posts, we can now start to setup a sample project using Yew.

First, a rust project is needed.

1
cargo new source

and we need to add dependencies to the cargo.toml :

1
2
3
4
5
6
7
[package]
name = "source"
version = "0.1.0"
edition = "2021"
[dependencies]
# this is the development version of Yew
yew = { git = "https://github.com/yewstack/yew/", features = ["csr"] }

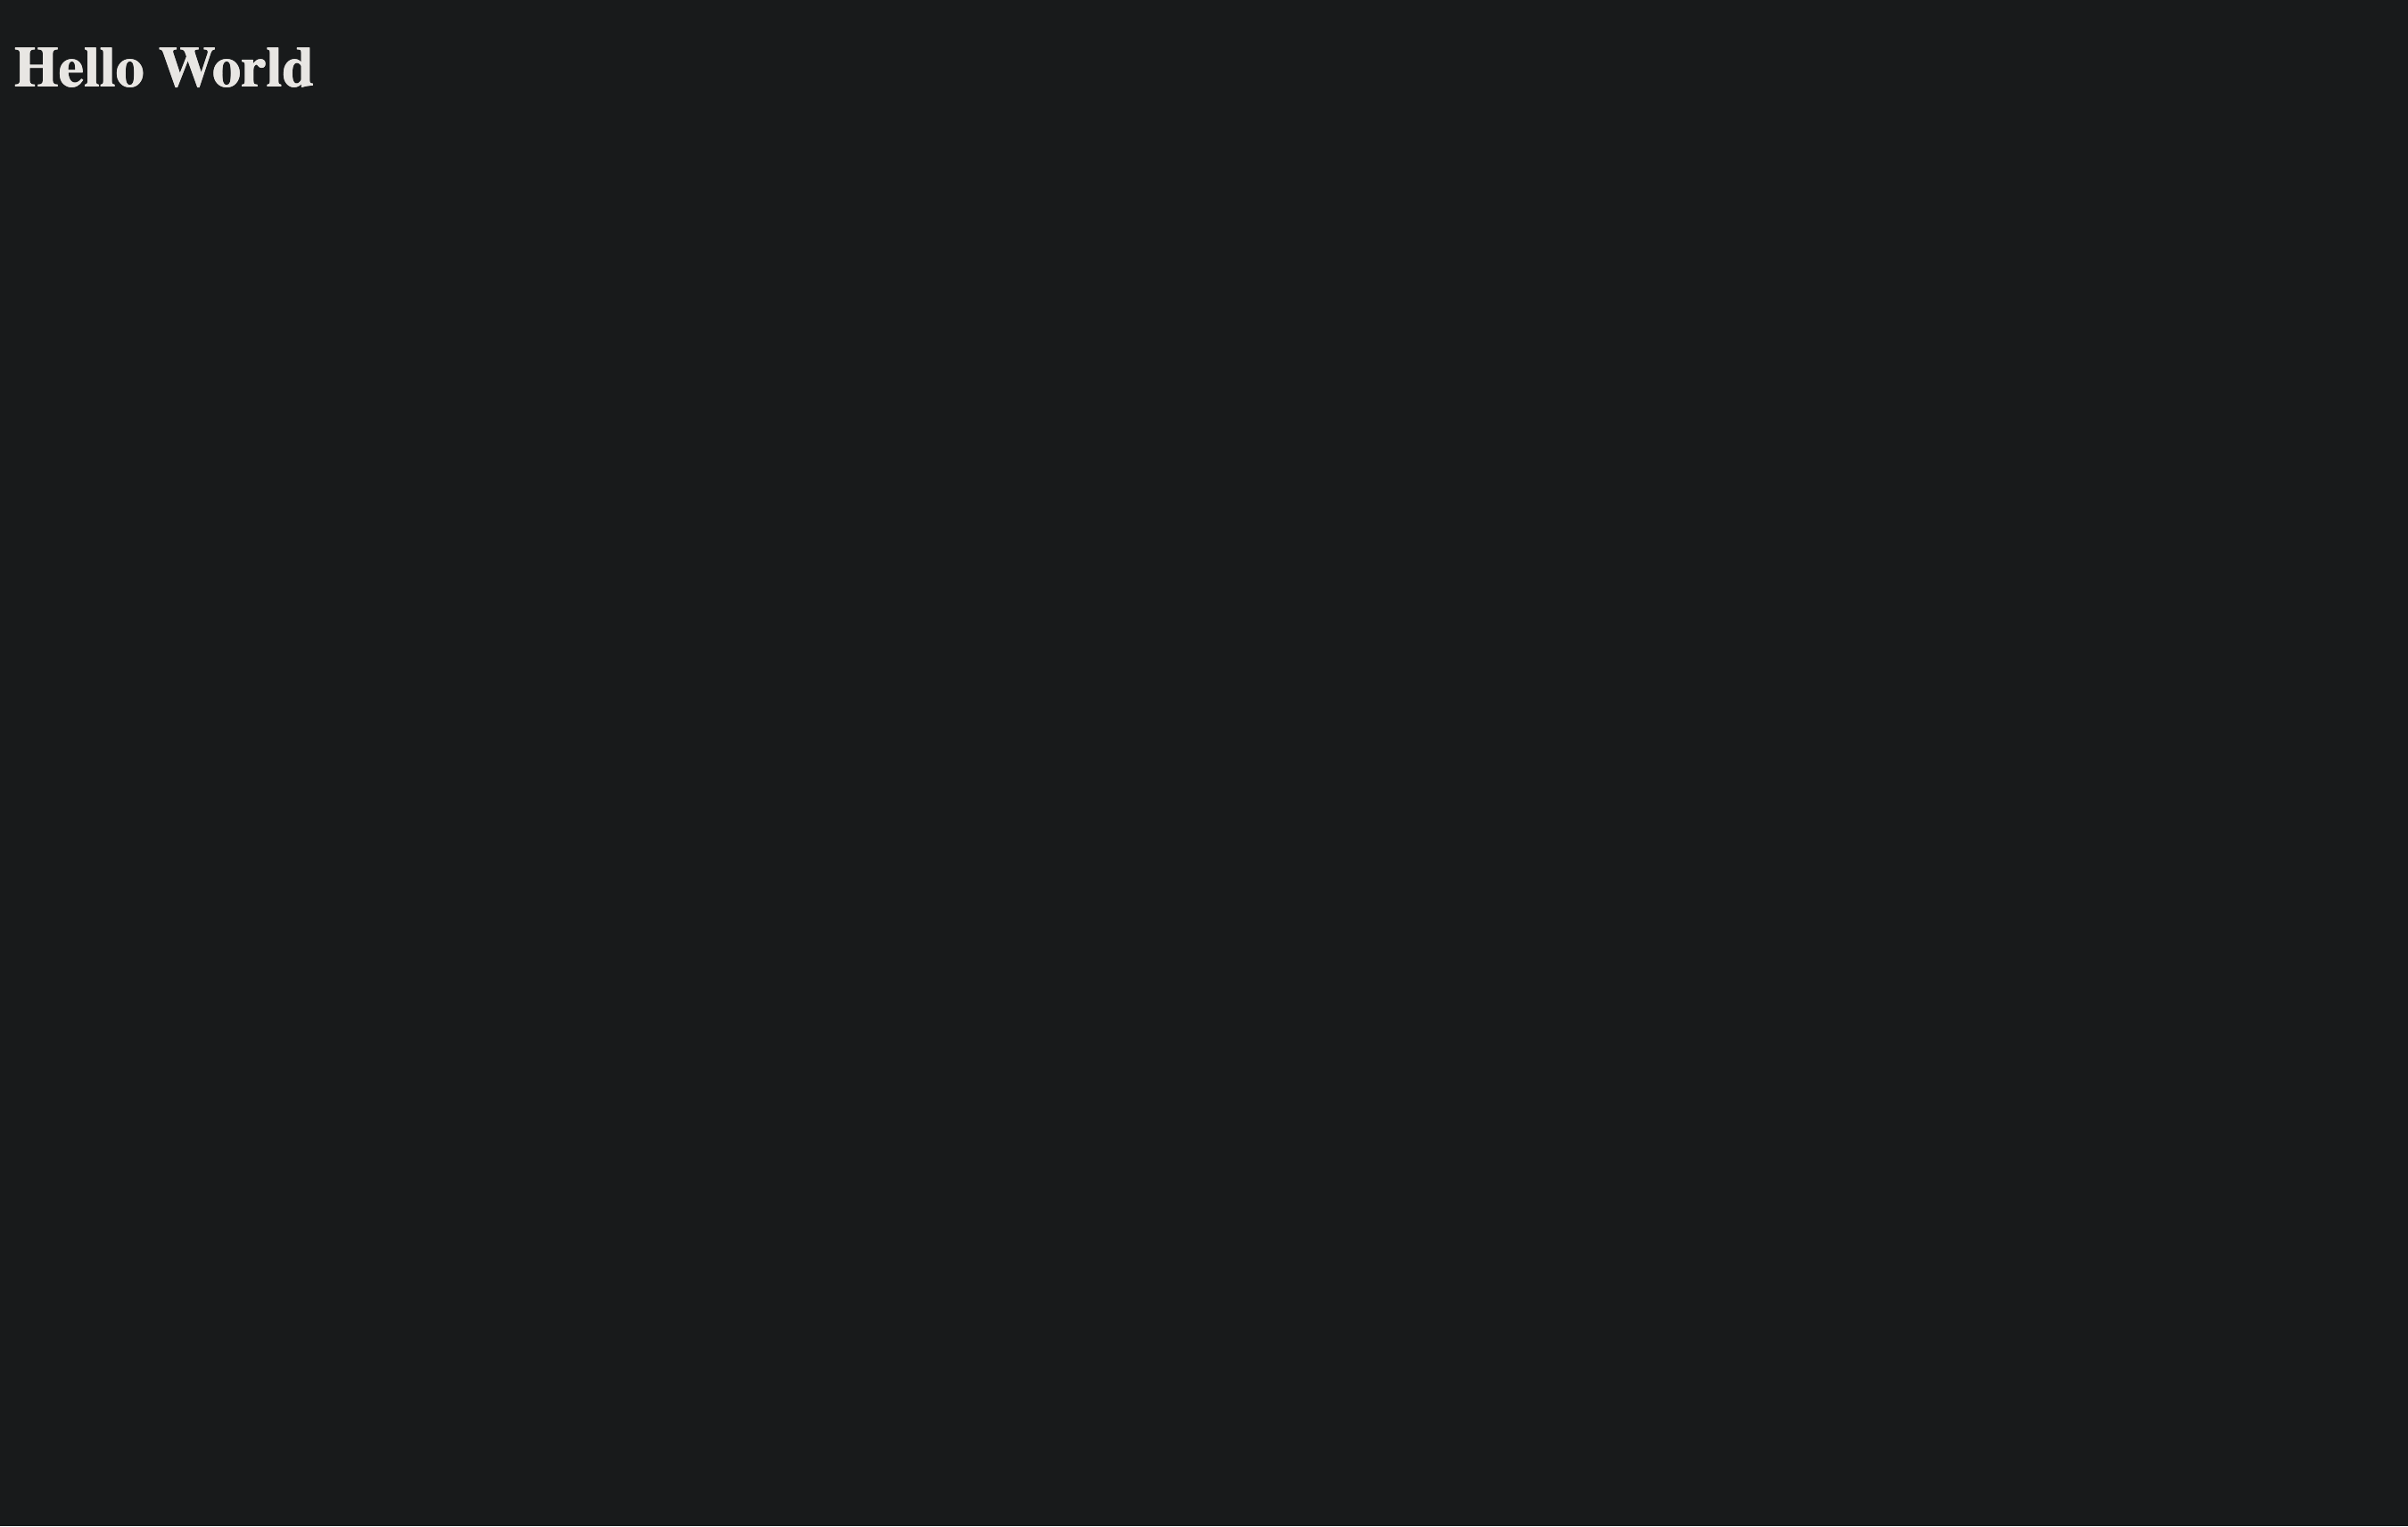
For our purpose, we will create a simple “hello world” webpage. In src/main.rs :

1
2
3
4
5
6
7
8
9
10
11
12
use yew::prelude::*;

#[function_component(App)]
fn app() -> Html {
html! {
<h1>{ "Hello World" }</h1>
}
}

fn main() {
yew::Renderer::<App>::new().render();
}

Isn’t there a deja vu when you see the <h1></h1> tag?

And a index.html on the root directory. In this case we will only contain a dummy page:

1
2
3
4
5
6
7
8
<!doctype html>
<html>
<head>
<meta charset="utf-8" />
<title>Yew App</title>
</head>
<body></body>
</html>

And we deploy the application:

1
trunk serve

here the trunk is the dependencies we introduced earlier, mainly used for wasm

and we have our hello world~

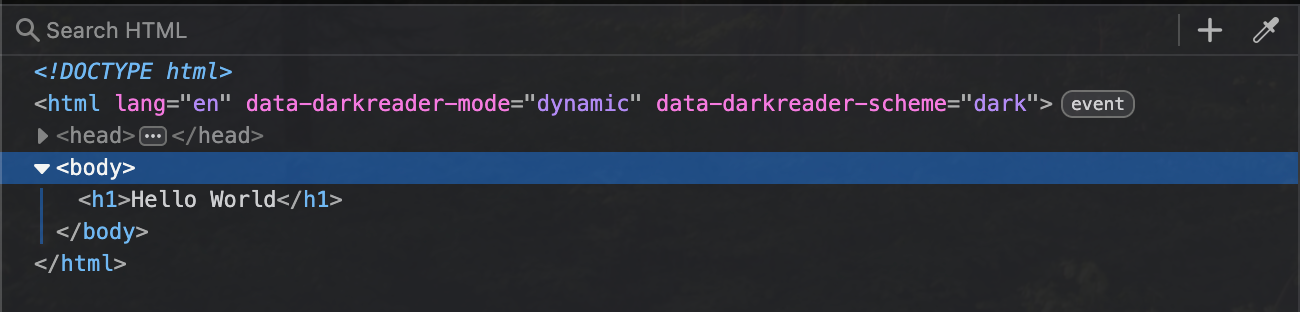
Notice that if we inspect our code, we see:

Notice that in the body section there is exactly the same code we have in our app function in src/main.rs . Some of you might notice that “hmm, this is similar to jsx(that you define HTML with code and use that as a component)?”. Yeah you are correct. We can definately define use more complicated html code.

# Building html with rust

For example, this code in the yew example website:

1
2
3
4
5
6
7
8
9
10
11
12
13
14
15
<h1>RustConf Explorer</h1>
<div>
<h3>Videos to watch</h3>
<p>John Doe: Building and breaking things</p>
<p>Jane Smith: The development process</p>
<p>Matt Miller: The Web 7.0</p>
<p>Tom Jerry: Mouseless development</p>
</div>
<div>
<h3>John Doe: Building and breaking things</h3>
<img
src="https://placehold.co/640x360.png?text=Video+Player+Placeholder"
thumbnail: https://github.com/kagurazaka-ayano/ImageSource/blob/215077e371c355fe3e2709f25b187b989c6a4844/00041-3060508023.png?raw=true
/>
</div>

can be transformed into this html! macro:

1
2
3
4
5
6
7
8
9
10
11
12
13
14
15
16
html! {
<>
<h1>{ "RustConf Explorer" }</h1>
<div>
<h3>{"Videos to watch"}</h3>
<p>{ "John Doe: Building and breaking things" }</p>
<p>{ "Jane Smith: The development process" }</p>
<p>{ "Matt Miller: The Web 7.0" }</p>
<p>{ "Tom Jerry: Mouseless development" }</p>
</div>
<div>
<h3>{ "John Doe: Building and breaking things" }</h3>
thumbnail: https://github.com/kagurazaka-ayano/ImageSource/blob/215077e371c355fe3e2709f25b187b989c6a4844/00041-3060508023.png?raw=true
</div>
</>
}

If we put this in the app function:

1
2
3
4
5
6
7
8
9
10
11
12
13
14
15
16
17
18
19
20
21
22
23
24
25
use yew::prelude::*;

#[function_component(App)]
fn app() -> Html {
html! {
<>
<h1>{ "RustConf Explorer" }</h1>
<div>
<h3>{"Videos to watch"}</h3>
<p>{ "John Doe: Building and breaking things" }</p>
<p>{ "Jane Smith: The development process" }</p>
<p>{ "Matt Miller: The Web 7.0" }</p>
<p>{ "Tom Jerry: Mouseless development" }</p>
</div>
<div>
<h3>{ "John Doe: Building and breaking things" }</h3>
thumbnail: https://github.com/kagurazaka-ayano/ImageSource/blob/215077e371c355fe3e2709f25b187b989c6a4844/00041-3060508023.png?raw=true
</div>
</>
}
}

fn main() {
yew::Renderer::<App>::new().render();
}

we get:

looks different because the first image is shot on mac but the second is shot on my desktop

With this in mind, we can generate some prefabs for some things we want to display. For example, if I have a file, I can store that with this struct:

1
2
3
4
5
6
struct File {
name: String,
owner: String,
permissions: String,
size_byte: i32,
}

And if we have a whole bunch of File objects, we can construct a big Html object, and use it inside our html with a {} :

1
2
3
4
5
6
7
8
9
10
11
12
13
14
15
16
17
18
19
20
21
22
23
24
25
26
27
28
29
30
31
32
33
34
35
36
37
38
39
40
41
42
43
44
45
46

#[function_component(App)]
fn app() -> Html {
let many_file = [
File {
name: "1.txt".to_string(),
owner: "Ayano Kagurazaka".to_string(),
size_byte: 200,
permissions: ".rwx------".to_string(),
},
File {
name: "2.md".to_string(),
owner: "Ayano Kagurazaka".to_string(),
size_byte: 1000,
permissions: ".rwx-wx-wx".to_string(),
},
File {
name: "3".to_string(),
owner: "Ayano Kagurazaka".to_string(),
size_byte: -1,
permissions: "drwx-wx-wx".to_string(),
},
];
let files = many_file
.iter()
.map(|val| {
html! {
<p>{format!("{} {} {} {}", val.permissions, val.size_byte, val.owner, val.name)}</p>
}
})
.collect::<Html>();

html! {
<>
<h1>{ "RustConf Explorer" }</h1>
<div>
<h3>{"Files:"}</h3>
{files}
</div>
<div>
<h3>{ "John Doe: Building and breaking things" }</h3>
thumbnail: https://github.com/kagurazaka-ayano/ImageSource/blob/215077e371c355fe3e2709f25b187b989c6a4844/00041-3060508023.png?raw=true
</div>
</>
}
}

The result:

# Components

(There are 2 types of components, structual and functional, we will only cover functional components in this article and structural in later articles)

Similar to some UI frameworks, like WinUI or Qt, we can define components as the building block of the website. For example, we can extract the files in the App component to another component:

1
2
3
4
5
6
7
8
9
10
11
12
13
14
15
16
17
18
19
20
21
22
23
24
25
#[derive(PartialEq)]
struct File {
name: String,
owner: String,
permissions: String,
size_byte: i32,
isdir: bool,
}

#[derive(Properties, PartialEq)]
struct FileWrapper {
files: Vec<File>,
}

#[function_component(FileList)]
fn file_list(FileWrapper { files }: &FileWrapper) -> Html {
files
.iter()
.map(|val| {
html! {
<p>{format!("{} {} {} {}", val.permissions, val.size_byte, val.owner, val.name)}</p>
}
})
.collect::<Html>()
}

In this case, we defined a Properties to be the input of the FileList component. This component is responsible for converting a list of file to HTML object. Notice to be able to use this wrapper as a Property, we added a PartialEq

# Getting interactive

Suppose we want to show the detail of the file when we clicked it(as if we selected it). We can do this, similar to many game engine or UI framework, by binding a callback to its properties.

To do this, we will modify our component and the file wrapper, or component property to be precise(since its a property of the component). And we will make a new component to display the detail of the file.

1
2
3
4
5
6
7
8
9
10
11
12
13
14
15
16
17
18
19
20
21
22
23
24
25
26
27
28
29
30
31
32
33
34
35
36
37
38
39
40
41
42
43
44
45

#[derive(PartialEq, Clone)]
struct File {
name: String,
owner: String,
permissions: String,
size_byte: i32,
}

// notice the name change here
#[derive(Properties, PartialEq)]
struct FileListProp {
files: Vec<File>,
on_click: Callback<File>,
}

#[function_component(FileList)]
fn file_list(FileListProp { files, on_click }: &FileListProp) -> Html {
files
.iter()
.map(|val| {
let on_file_clicked = {
let on_click = on_click.clone();
let file = val.clone();
Callback::from(move |_| on_click.emit(file.clone()))
};
html! {
// another deja vu from html
<p onclick={on_file_clicked}>{format!("{}", val.name)}</p>
}
})
.collect::<Html>()
}

#[derive(Properties, PartialEq)]
struct FileDetailProps {
file: File,
}

#[function_component(FileDetail)]
fn file_detail(FileDetailProps { file }: &FileDetailProps) -> Html {
html! {
<div>{format!("{} {} {} {}", file.name, file.owner, file.permissions, file.size_byte)}</div>
}
}

Now we configure the callback in our App component, by creating a state handle and updating it in a callback.

1
2
3
4
5
6
7
8
9
10
11
12
13
14
15
16
17
18
19
20
21
22
23
24
25
26
27
28
29
30
31
32
33
34
35
36
37
38
39
40
41
42
43
44
#[function_component(App)]
fn app() -> Html {
File {
name: "1.txt".to_string(),
owner: "Ayano Kagurazaka".to_string(),
size_byte: 200,
permissions: ".rwx------".to_string(),
},
File {
name: "2.md".to_string(),
owner: "Ayano Kagurazaka".to_string(),
size_byte: 1000,
permissions: ".rwx-wx-wx".to_string(),
},
File {
name: "3".to_string(),
owner: "Ayano Kagurazaka".to_string(),
size_byte: -1,
permissions: "drwx-wx-wx".to_string(),
},
];
let selected_file = use_state(|| None);
let on_file_selected = {
let selected_file = selected_file.clone();
Callback::from(move |file: File| {
selected_file.set(Some(file));
})
};
let details = selected_file.as_ref().map(|file| {
html! {
<FileDetail file={file.clone()}/>
}
});
html! {
<>
<h1>{ "RustConf Explorer" }</h1>
<div>
<h3>{"Files:"}</h3>
<FileList files={many_file} on_click={on_file_selected}/>
</div>
{for details}
</>
}
}

The handle we defined are called hooks, and they are used to store states that can be accessed by other components with handlers. It’s like a singleton that records global states, but managed by yew instead of user(user can define hooks, too). I will probably cover them in later articles… probably.

Code can be found in this repo

Comments